Bluetooth Low Energy (BLE) là một dạng Bluetooth tiết kiệm năng lượng, được sử dụng nhiều trong các dự án điện tử. Trong bài viết này, hãy cùng tìm hiểu cách sử dụng BLE trên mạch ESP32 nhé! Mình sẽ hướng dẫn bạn cách cấu hình BLE ESP32 trên cả 2 thiết bị là Server (máy chủ) và Client (máy khách). Chúng ta sẽ kết nối điện thoại của mình với BLE ESP32.
Tổng quan về Bluetooth Low Energy
Điểm nổi bật chính của công nghệ Bluetooth 4.0 là có khả năng tích hợp Bluetooth Low Energy (nói ngắn gọn là BLE). Trước đây, BLE có tên là Bluetooth Smart. Đây là một phiên bản Classic Bluetooth đã được tối ưu hóa thiết kế, dành riêng cho những mạng kết nối không dây có yêu cầu tiêu thụ điện năng thấp.
Dưới đây là điểm khác biệt chính giữa Classic Bluetooth và BLE:
- Classic Bluetooth: Được thiết kế để thay thế các giao tiếp có dây bằng giao tiếp không dây ở khoảng cách gần. Classic Bluetooth chú trọng vào tốc độ truyền tải dữ liệu và ứng dụng, chúng phù hợp để truyền các tập tin lớn. Về tốc độ dữ liệu thì thường được đề cập đến Basic Rate và Enhancede Data rate.
- BLE: Là mạng Bluetooth đã được tối ưu hóa mức tiêu thụ điện năng thay vì tối ưu hóa tốc độ truyền tải dữ liệu. BLE thường được ứng dụng trong các dự án điện tử IoT chạy bằng pin. Một số ứng dụng của BLE ESP32 là máy theo dõi tập thể dục, đồng hồ thông minh, thiết bị theo dõi sức khỏe,…
Classic Bluetooth luôn ở chế độ được kết nối, còn BLE thường ở chế độ chờ (không hoạt động) và chúng chỉ thức dậy khi được yêu cầu. Điều này BLE khiến có mức tiêu thụ điện cực thấp.
Bluetooth Low Energy cũng hoạt động ở mức 2,4 GHz. Do đó, cùng một ăngten có thể sử dụng cho cả wi-fi và hai phiên bản Bluetooth là Classic Bluetooth và BLE.
Các lớp trong Bluetooth Low Energy
Một thiết bị BLE cơ bản gồm có ba lớp:
- Bộ điều khiển Controller
- Host
- Ứng dụng Application
Cụ thể như hình:
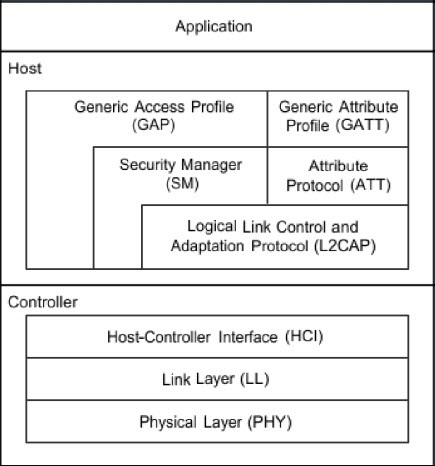
Trong đó, từng lớp sẽ có các lớp con bên trong như sau:
| Controller | Host | Application |
| Lớp vật lý (Physical Layer – PHY) Lớp liên kết (Link Layer – LL) Giao diện điều khiển máy chủ trong Controller (Host-Controller Interface – HCI) | Giao diện Controller tại Host (HCI) Giao thức logic điều khiển liên kết và ứng dụng (Logical Link Control and Application Protocol – L2CAP) Quản lý bảo mật (Security Manager – SM) Giao thức thuộc tính (Attribute Protocol – ATT) Hồ sơ truy cập chung (Generic Access Profile – GAP) Hồ sơ thuộc tính chung (Generic Attribute Profile – GATT) | Nơi chứa các giao diện người dùng, cho phép xử lý dữ liệu và các tính năng logic của ứng dụng |
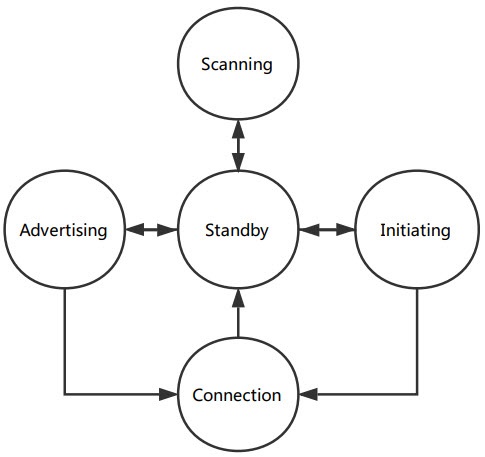
Các trạng thái của BLE
Có 5 trạng thái chính của BLE:
- Standby
- Advertising
- Scanning
- Initiating
- Connected
Tổng quan về BLE ESP32
Điểm nổi bật chính của mạch ESP32 là hỗ trợ wi-fi. Nhưng bên cạnh đó các mạch ESP32 SoC cũng có hỗ trợ Bluetooth ở 2 phiên bản khác nhau: Classic Bluetooth và BLE.
Bluetooth trong ESP32 cũng có thông số kỹ thuật tương tự như Classic Bluetooth 4.2 và BLE. Trong bài viết này, mình sẽ hướng dẫn bạn cách làm việc với BLE ESP32.
Mô hình Server – Client trong BLE ESP32
Bất kỳ thiết bị BLE nào cũng đều có thể được cấu hình để thành server (máy chủ) hoặc Client (máy khách). Và ESP32 cũng tương tự:
- ESP32 Server: Cho phép người dùng hoặc các Client kết nối để đọc dữ liệu của nó
- ESP32 Client: Quét tìm Server và tạo kết nối để nhận dữ liệu từ Server
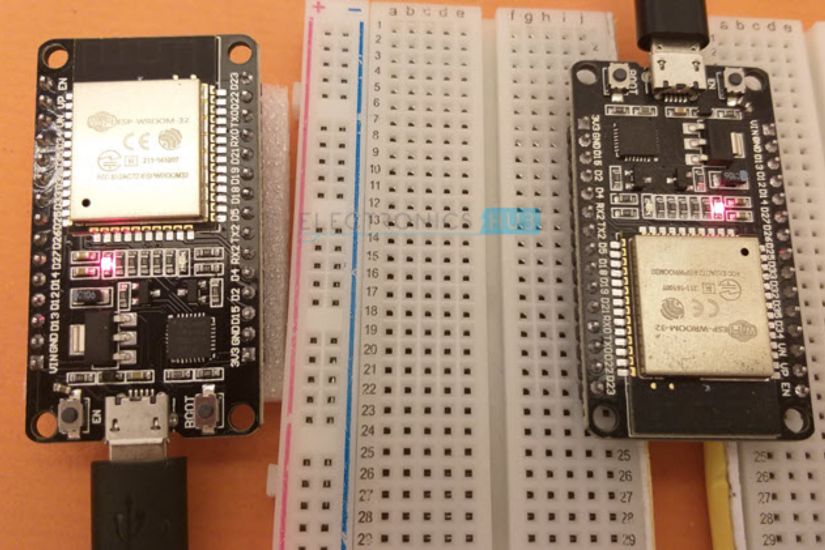
Trong mô hình này, mình sẽ hướng dẫn bạn với 2 mạch ESP32 khác nhau: 1 mạch được dùng làm máy chủ và 1 mạch dùng làm máy khách.
BLE ESP32 Server
Đầu tiên, mình sẽ hướng dẫn bạn cách cấu hình 1 mạch ESP32 thành BLE Server (Máy chủ BLE).
Kết nối:
Bạn thực hành theo 2 bước sau để kết nối:
- Kết nối ESP32 với máy tính, mạch này được gọi là ESP32-BLE_Server
- Mở Arduino IDE, chọn đúng mạch ESP32 và cổng COM đã keesst nối
Lập trình:
Bạn upload đoạn code bên dưới vào mạch ESP32 Server nhé:
#include <BLEDevice.h>
#include <BLEUtils.h>
#include <BLEServer.h>

// See the following for generating UUIDs:
// https://www.uuidgenerator.net/

#define SERVICE_UUID        "4fafc201-1fb5-459e-8fcc-c5c9c331914b"
#define CHARACTERISTIC_UUID "beb5483e-36e1-4688-b7f5-ea07361b26a8"

/* BLEServer *pServer = BLEDevice::createServer();
BLEService *pService = pServer->createService(SERVICE_UUID);
BLECharacteristic *pCharacteristic = pService->createCharacteristic(
                                         CHARACTERISTIC_UUID,
                                         BLECharacteristic::PROPERTY_READ |
                                         BLECharacteristic::PROPERTY_WRITE
                                       ); */

BLEServer *pServer;
BLEService *pService;
BLECharacteristic *pCharacteristic;


void setup()
{
  Serial.begin(115200);
  Serial.println("Starting BLE Server!");

  BLEDevice::init("ESP32-BLE-Server");
  pServer = BLEDevice::createServer();
  pService = pServer->createService(SERVICE_UUID);
  pCharacteristic = pService->createCharacteristic(
                                         CHARACTERISTIC_UUID,
                                         BLECharacteristic::PROPERTY_READ |
                                         BLECharacteristic::PROPERTY_WRITE
                                       );


  /* BLEServer *pServer = BLEDevice::createServer();
  BLEService *pService = pServer->createService(SERVICE_UUID);
  BLECharacteristic *pCharacteristic = pService->createCharacteristic(
                                         CHARACTERISTIC_UUID,
                                         BLECharacteristic::PROPERTY_READ |
                                         BLECharacteristic::PROPERTY_WRITE
                                       );*/

  pCharacteristic->setValue("Hello, World!");
  pService->start();
  //BLEAdvertising *pAdvertising = pServer->getAdvertising();
  BLEAdvertising *pAdvertising = BLEDevice::getAdvertising();
  pAdvertising->addServiceUUID(SERVICE_UUID);
  pAdvertising->setScanResponse(true);
  pAdvertising->setMinPreferred(0x06);  // functions that help with iPhone connections issue
  pAdvertising->setMinPreferred(0x12);
  BLEDevice::startAdvertising();
  //pAdvertising->start();
  Serial.println("Characteristic defined! Now you can read it in the Client!");
}

void loop()
{
  std::string value = pCharacteristic->getValue();
  Serial.print("The new characteristic value is: ");
  Serial.println(value.c_str());
  delay(2000);
}


1
BLE ESP32 Client
Kết nối:
Bạn hãy dùng một mạch ESP32 khác (đặt tên là ESP32-BLE_Client) và kết nối với máy tính, sau đó chọn đúng cổng COM và đúng mạch như ESP32 Server.
Lập trình:
Mình đã sửa một vài đoạn nhỏ trong ‘BLE_client’ của thư viện BLE ESP32 để sử dụng. Bạn có thể upload trực tiếp đoạn code sau vào mạch BLE ESP32 Client:
#include "BLEDevice.h"

/* Specify the Service UUID of Server */
static BLEUUID serviceUUID("4fafc201-1fb5-459e-8fcc-c5c9c331914b");
/* Specify the Characteristic UUID of Server */
static BLEUUID    charUUID("beb5483e-36e1-4688-b7f5-ea07361b26a8");

static boolean doConnect = false;
static boolean connected = false;
static boolean doScan = false;
static BLERemoteCharacteristic* pRemoteCharacteristic;
static BLEAdvertisedDevice* myDevice;

static void notifyCallback(BLERemoteCharacteristic* pBLERemoteCharacteristic,
                            uint8_t* pData, size_t length, bool isNotify)
{
  Serial.print("Notify callback for characteristic ");
  Serial.print(pBLERemoteCharacteristic->getUUID().toString().c_str());
  Serial.print(" of data length ");
  Serial.println(length);
  Serial.print("data: ");
  Serial.println((char*)pData);
}

class MyClientCallback : public BLEClientCallbacks
{
  void onConnect(BLEClient* pclient)
  {

  }

  void onDisconnect(BLEClient* pclient)
  {
    connected = false;
    Serial.println("onDisconnect");
  }
};

/* Start connection to the BLE Server */
bool connectToServer()
{
  Serial.print("Forming a connection to ");
  Serial.println(myDevice->getAddress().toString().c_str());

  BLEClient*  pClient  = BLEDevice::createClient();
  Serial.println(" - Created client");

  pClient->setClientCallbacks(new MyClientCallback());

    /* Connect to the remote BLE Server */
  pClient->connect(myDevice);  // if you pass BLEAdvertisedDevice instead of address, it will be recognized type of peer device address (public or private)
  Serial.println(" - Connected to server");

    /* Obtain a reference to the service we are after in the remote BLE server */
  BLERemoteService* pRemoteService = pClient->getService(serviceUUID);
  if (pRemoteService == nullptr)
  {
    Serial.print("Failed to find our service UUID: ");
    Serial.println(serviceUUID.toString().c_str());
    pClient->disconnect();
    return false;
  }
  Serial.println(" - Found our service");


  /* Obtain a reference to the characteristic in the service of the remote BLE server */
  pRemoteCharacteristic = pRemoteService->getCharacteristic(charUUID);
  if (pRemoteCharacteristic == nullptr)
  {
    Serial.print("Failed to find our characteristic UUID: ");
    Serial.println(charUUID.toString().c_str());
    pClient->disconnect();
    return false;
  }
  Serial.println(" - Found our characteristic");

  /* Read the value of the characteristic */
  /* Initial value is 'Hello, World!' */
  if(pRemoteCharacteristic->canRead())
  {
    std::string value = pRemoteCharacteristic->readValue();
    Serial.print("The characteristic value was: ");
    Serial.println(value.c_str());
  }

  if(pRemoteCharacteristic->canNotify())
  {
    pRemoteCharacteristic->registerForNotify(notifyCallback);

  }

    connected = true;
    return true;
}
/* Scan for BLE servers and find the first one that advertises the service we are looking for. */
class MyAdvertisedDeviceCallbacks: public BLEAdvertisedDeviceCallbacks
{
 /* Called for each advertising BLE server. */
  void onResult(BLEAdvertisedDevice advertisedDevice)
  {
    Serial.print("BLE Advertised Device found: ");
    Serial.println(advertisedDevice.toString().c_str());

    /* We have found a device, let us now see if it contains the service we are looking for. */
    if (advertisedDevice.haveServiceUUID() && advertisedDevice.isAdvertisingService(serviceUUID))
    {
      BLEDevice::getScan()->stop();
      myDevice = new BLEAdvertisedDevice(advertisedDevice);
      doConnect = true;
      doScan = true;

    }
  }
};


void setup()
{
  Serial.begin(115200);
  Serial.println("Starting Arduino BLE Client application...");
  BLEDevice::init("ESP32-BLE-Client");

  /* Retrieve a Scanner and set the callback we want to use to be informed when we
     have detected a new device.  Specify that we want active scanning and start the
     scan to run for 5 seconds. */
  BLEScan* pBLEScan = BLEDevice::getScan();
  pBLEScan->setAdvertisedDeviceCallbacks(new MyAdvertisedDeviceCallbacks());
  pBLEScan->setInterval(1349);
  pBLEScan->setWindow(449);
  pBLEScan->setActiveScan(true);
  pBLEScan->start(5, false);
}


void loop()
{

  /* If the flag "doConnect" is true, then we have scanned for and found the desired
     BLE Server with which we wish to connect.  Now we connect to it.  Once we are
     connected we set the connected flag to be true. */
  if (doConnect == true)
  {
    if (connectToServer())
    {
      Serial.println("We are now connected to the BLE Server.");
    }
    else
    {
      Serial.println("We have failed to connect to the server; there is nothin more we will do.");
    }
    doConnect = false;
  }

  /* If we are connected to a peer BLE Server, update the characteristic each time we are reached
     with the current time since boot */
  if (connected)
  {
    String newValue = "Time since boot: " + String(millis()/2000);
    Serial.println("Setting new characteristic value to \"" + newValue + "\"");

    /* Set the characteristic's value to be the array of bytes that is actually a string */
    pRemoteCharacteristic->writeValue(newValue.c_str(), newValue.length());
    /* You can see this value updated in the Server's Characteristic */
  }
  else if(doScan)
  {
    BLEDevice::getScan()->start(0);  // this is just example to start scan after disconnect, most likely there is better way to do it in arduino
  }

  delay(2000); /* Delay a second between loops */
}
1
Cách hoạt động
Sau khi upload cả 2 đoạn code trên vào 2 mạch ESP32, điều tiếp theo là bạn cần theo dõi các cổng kết nối của cả 2 để xem cách chúng kết nối và giao tiếp với nhau. Để làm được điều đó, chúng ta sẽ:
- Dùng Serial Monitor của Arduino IDE để quan sát cổng COM của BLE ESP32 Client
- Dùng một phần mềm khác, chẳng hạn như Terminal hoặc Putty để quan sát cổng COM của BLE ESP32 Server
Sau khi mở các trình quan sát trên, bạn hãy reset lại cả 2 mạch ESP32 bằng cách nhấn vào nút ENABLE. Lúc này, cả 2 mạch sẽ hoạt động như sau:
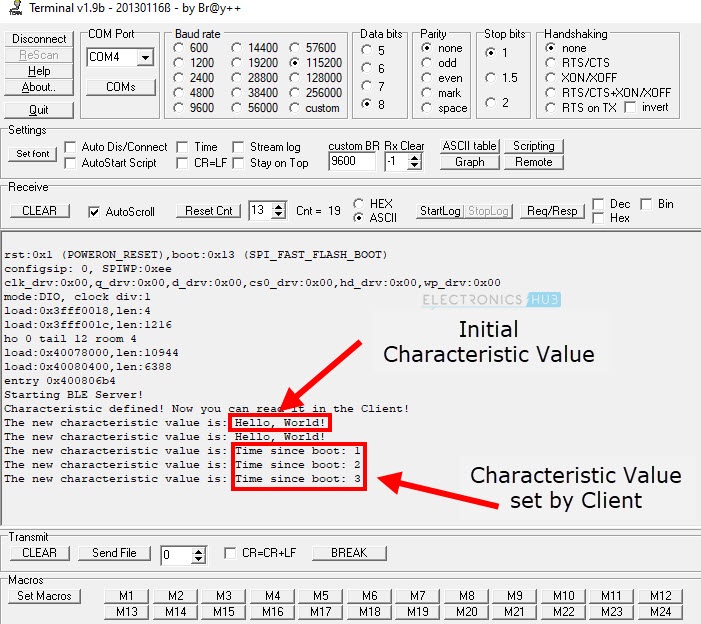
- ESP32 Server khởi động BLE Server và thể hiện sự hiện diện của nó. Khi ESP32 Client quét thấy Server thì sẽ tạo kết nối giữa 2 mạch
- Khi kết nối xong, ESP32 Client sẽ đọc giá trị từ Server (Trong chương trình trên ở Server, mình điền giá trị là ‘Hello, world’) và in nó ra trình theo dõi Serial Monitor
- Sau đó, cứ sau vài giây thì ESP32 Client sẽ đặt các giá trị Server mới một lần
- Riêng với ESP32 Client, sau khi khởi động BLE Server, nó sẽ đọc giá trị của chính nó sau vài mỗi vài giây như hình bên dưới:
Kết nối BLE ESP32 Server với điện thoại
Dưới đây, mình đã chuẩn bị sẵn đoạn code để kết nối mạch ESP32 với điện thoại thông qua công nghệ Bluetooth Low Energy. Bạn hãy upload code sau vào mạch của mình và sử dụng nhé:
#include <BLEDevice.h>
#include <BLEUtils.h>
#include <BLEServer.h>

// See the following for generating UUIDs:
// https://www.uuidgenerator.net/

#define SERVICE_UUID        "4fafc201-1fb5-459e-8fcc-c5c9c331914b"
#define CHARACTERISTIC_UUID "beb5483e-36e1-4688-b7f5-ea07361b26a8"


class MyCallbacks: public BLECharacteristicCallbacks
{
  void onWrite(BLECharacteristic *pCharacteristic)
  {
    std::string value = pCharacteristic->getValue();

    if (value.length() > 0)
    {
      Serial.println("*********");
      Serial.print("New value: ");
      for (int i = 0; i < value.length(); i++)
      {
        Serial.print(value[i]);
      }

      Serial.println();
      Serial.println("*********");
    }
  }
};

void setup()
{
  Serial.begin(115200);

  Serial.println("1- Download and install an BLE scanner app in your phone");
  Serial.println("2- Scan for BLE devices in the app");
  Serial.println("3- Connect to ESP32-BLE_Server");
  Serial.println("4- Go to CUSTOM CHARACTERISTIC in CUSTOM SERVICE and write something");
  Serial.println("5- See the magic =)");

  BLEDevice::init("ESP32-BLE-Server");
  BLEServer *pServer = BLEDevice::createServer();

  BLEService *pService = pServer->createService(SERVICE_UUID);

  BLECharacteristic *pCharacteristic = pService->createCharacteristic(
                                         CHARACTERISTIC_UUID,
                                         BLECharacteristic::PROPERTY_READ |
                                         BLECharacteristic::PROPERTY_WRITE
                                       );

  pCharacteristic->setCallbacks(new MyCallbacks());

  pCharacteristic->setValue("Hello World");
  pService->start();

  BLEAdvertising *pAdvertising = pServer->getAdvertising();
  pAdvertising->start();
}

void loop()
{
  delay(2000);
}
1
Trên điện thoại, bạn hãy tải ứng dụng BLE Scanner trên Google Play hoặc AppStore nhé! Sau đó, bạn mở app, đặt điện thoại ở gần mạch ESP32 và tiến hành quét để ghép nối.
Sau khi nhấn quét, trên app sẽ tìm và liệt kê các thiết bị BLE có thể tìm thấy. Trong đó, bạn sẽ thấy thiết bị có tên là ESP32-BLE-Server:
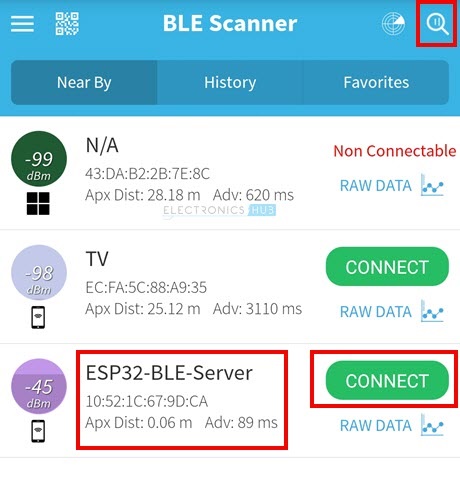
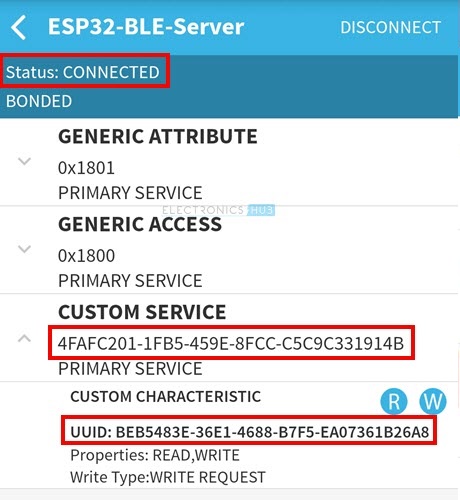
Bạn click vào mục CONNECT để kết nối Smartphone với mạch ESP32. Khi kết nối xong, trên điện thoại sẽ hiển thị các dịch vụ và đặc điểm của nó.
Vì trong chương trình mình chỉ sử dụng 1 dịch vụ, nên bạn chỉ thấy 1 UUID dịch vụ và mã UUID trong phần Custom Service như hình dưới:
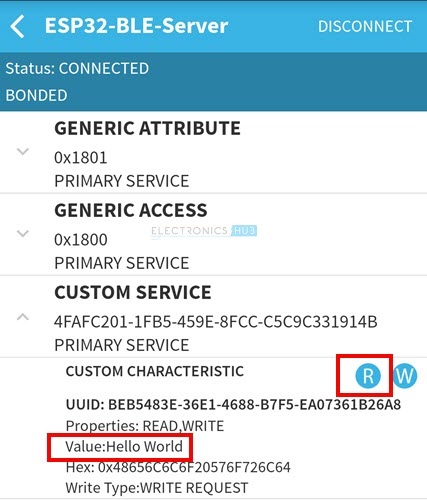
Để đọc giá trị ban đầu, bạn có thể nhấn vào icon R (read) như hình dưới. Chúng sẽ đọc giá trị từ ESP32 Server và hiển thị ra trong mục value:
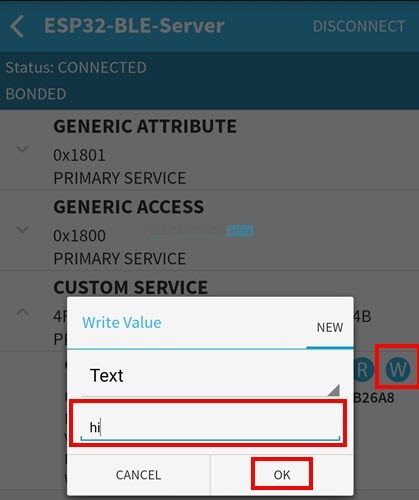
Trong thuộc tính, mình cài sẵn là cho phép đọc và ghi. Do đó, chúng ta có thể đặt giá trị cho đặc tính tùy thích thông qua icon W (write). Giao diện sẽ hiển thị một khung văn bản để bạn nhập vào. Khi nhập xong, bạn hãy click OK để lưu giá trị này vào ESP32 Server:
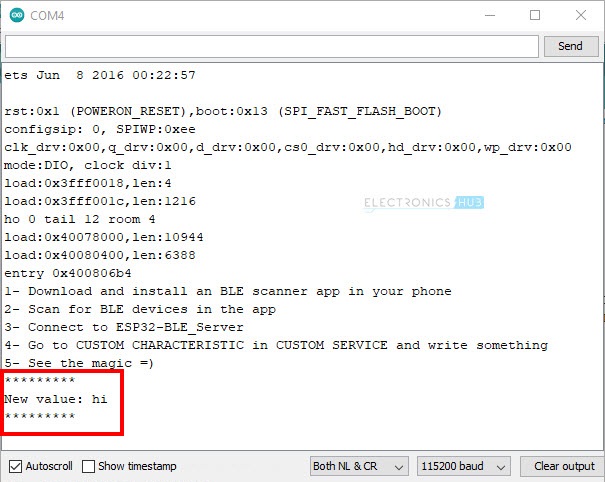
Nếu bạn mở Serial Monitor trên máy tính, bạn có thể thấy Server ESP32 in ra giá trị vừa được đặt:
Lời kết
Trong bài viết trên, IoTZone đã hướng dẫn bạn chi tiết về khái niệm Bluetooth Low Energy là gì, các lớp thành phần cũng như cách ứng dụng vào làm dự án với mạch ESP32. Chúng ta có thể cho 2 mạch ESP32 giao tiếp với nhau qua BLE, hoặc cho điện thoại kết nối với ESP32 Server tùy thích.
Đây chỉ là một hướng dẫn nhỏ để bạn làm quen với công nghệ Bluetooth Low Energy. Trong tương lai, mình sẽ cung cấp thêm các dự án nâng cao và đa dạng hơn, liên quan đến Internet of Things cho bạn tham khảo nhé!